WE TRANSLATE PHALENOPSIS AFTER PURCHASE
PHALENOPSIS TRANSPLANTATION AFTER PURCHASE
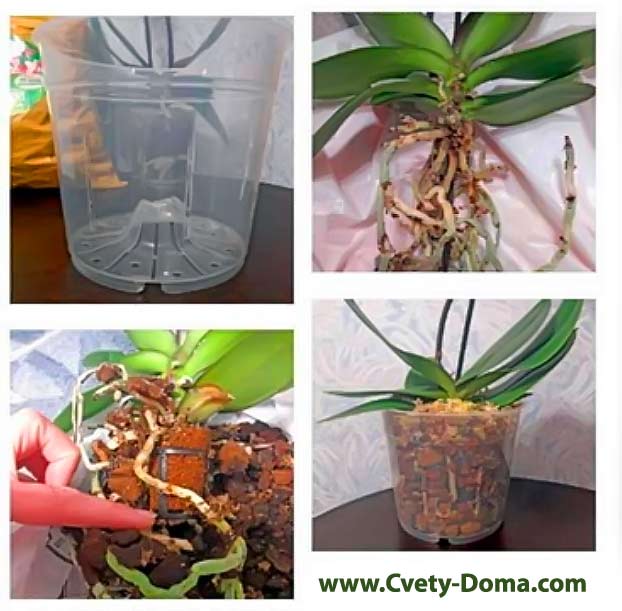
PHALENOPSIS TRANSFER TANK
I choose a transparent pot for phalaenopsis, since it is easier to monitor the condition of the roots and you can see, do i need to water. If there are no holes in the bottom and in the side walls for excess water drain and air access, I make them with a hot soldering iron. I pour expanded clay drainage along the height of the convex part of the bottom.
SUBSTRATE FOR PHALENOPSIS
I mix (2:1:1:0,5) coarse pine bark, not less 2-3 cm (shallow retains moisture longer and can contribute to rotting of the root system), sphagnum moss - squares on 2 cm (prevents the development of rot and retains moisture), expanded clay medium fraction (by 1 cm), charcoal - pieces not less 2 cm (small ones collapse over time and compact the soil).
WORKING WITH ROOTS
Handle brittle phalaenopsis roots with extreme care. If there are black (rotten), I cut them with a stationery knife with a sharp sterile (every time I wipe with alcohol) blade, capturing on 2 mm healthy tissue. Sprinkle the slices with crushed activated charcoal or charcoal. By the way, I remove rotten leaves in the same way. I cut off dry roots, before reaching healthy tissue 2 mm. If you come across plastic cups and pieces of sponge in the roots, clean up carefully. I leave the orchid on 12 hours for drying slices, to heal the tissue. If there were no rotten roots, I immediately plant a plant in a pot.
LANDING OF PHALENOPSIS
I pour a layer of dry substrate 2-3 cm on expanded clay. I place the orchid in the pot with one hand. The second one I fill in the voids between the roots. I don’t crush the soil, so as not to injure the roots, but just lightly tap on the walls of the flowerpot. I cover the surface of the substrate around the outlet with sphagnum. Then I periodically spray it for additional moisture, and aerial roots will dry out less.
ADAPTATION
The first time I water the orchid not earlier than in a day (even if there were no rotten roots, then during the transplant they could be injured).
Для более быстрой адаптации использую «Эпин» (2-3 drops on 100 ml of water) or succinic acid (1 tab, on 1 l). I wet a cotton swab in a solution, squeeze and rub the leaves. If moisture gets into the center of the outlet, blot with a dry napkin.
On a note: how to wake up sleeping buds in phalaenopsis
Woke up sleeping kidneys
Markdown white phalaenopsis had two cut stalks above the dormant bud. On one of them, the upper kidney woke up, but then it stopped developing: does not grow and does not die - froze.

Phalenxis – dormant kidneys
Although I was feeding the orchid, watered once in 10-14 days. This went on for about six months.. Then she removed the second peduncle, to give strength to the first, and brought the plant into a cool (+16-18 city., not less) premises. The result is a temperature difference. Two weeks later I noticed, that below the frozen kidney another woke up, which began to develop into a lateral peduncle.
Buds appeared on the arrow. Another orchid, spotted, also experienced a temperature drop. A peduncle appeared on it, but not side, and new, between the leaves. Interesting, that the white phalaenopsis bloomed everything 2 months, and spotted with a new arrow pleases already 4 months and is not going to fade.
© Author: Gulzhan SHARIPOVA. Saratov region. Photo by the author
PHALENOPSIS TRANSPLANTATION – VIDEO


© Author: Inna KRAVCHENKO, Photo by the author


Хитрость с цветоносом
Когда у фаленопсиса отрезаем отслуживший цветонос, внутри него видна полость. При замачивании орхидеи туда может затекать вода, застаивается там, и начинается процесс гниения. Как не допустить неприятности?
Если растение куплено в магазине с коротким пеньком, капаю на него (как бы
«закупориваю») 1-2 капли горячего воска.
Когда сама срезаю цветонос, оставляю от основания «хвостик» длиной не менее 8-10 cm. При поливе вода не достает до полости. Место среза обязательно присыпаю активированным углем.
Phalaenopsis transplant
Пересаживаю фаленопсисы, когда они не цветут. therefore, если отдых выпадает на зимние месяцы, то с процедурой не тяну.
Сажаю в прозрачные горшки объемом в 1, 5 раза больше размера корневой системы, чтобы корни хорошо развивались и не надо было часто пересаживать. Кроме дренажных отверстий в дне, делаю дополнительные в стенках (горячим паяльником). Кору для субстрата обязательно прокаливаю в духовке, а накануне пересадки замачиваю в воде на сутки.
Пересаженное растение первый раз поливаю спустя пару недель.
Никогда не спешу срезать отцветший цветонос, так как спустя некоторое время фаленопсис может зацвести на нем повторно. А вот воздушные корни иногда подрезаю, чтобы не торчали и не портили внешний вид растения. Хотя по этому поводу у нас спор с подругой.
В природе у эпифита фаленопсиса корни поглощают воду и питательные вещества из воздуха и им не нужно стремиться к грунту. Это свойство сохраняется и в домашних условиях. Воздушные корешки обрезать нельзя. Они фотосинтезируют на свету и питают орхидею. That, что они растут в любом месте стволика и в разные стороны, — особенность растения, которую нужно принять.
Ольга ПУЩИНА, collector, Новосибирская обл.