STREEPTOCARPUS: BEAUTIFUL BLOSSOMING WITHOUT EXCESS

Choosing the best streptocarpus variety is difficult - each is beautiful in its own way. Yes, and an individual plant needs an individual approach.. Some specimens easily adapt to the microclimate of your apartment, others won't like it. But if streptocarpus has taken root, it will delight for many years!
In any case, the main thing is to initially choose a good seedling.. Leaves must be strong, without spots. The roots are light and well developed. Potted soil - slightly damp. And what to do next with a newbie - our readers will tell you.
HOME STRAPTOKARPUS CARE IN TABLE
|
COMPONENTS OF SUCCESS |
|
|
Temperature |
+ 18-23 city. (max +25) |
|
Lighting |
Bright diffused (shade from the direct sun) |
|
Wintering |
I don't feed the plants, only support those, that bloom. For vacationers, I reduce watering |
|
Transfer |
I transplant small specimens (or overload) as you grow, large - every 45 months. I transplant carefully, not disturbing the roots too much or compacting the soil, to keep it light, saturated with air |
|
Top dressing
|
I start feeding about a month after planting. For the growth and growth of green mass I use fertilizers with a high nitrogen content, for flowering - phosphorus and potassium. I add with every watering 56 drops of fertilizer on 1 l of water |
I transplant small specimens (or overload) as you grow, large - every 45 months. I transplant carefully, not disturbing the roots too much or compacting the soil, to keep it light, saturated with air /
Top dressing
I start feeding about a month after planting. For the growth and growth of green mass I use fertilizers with a high nitrogen content, for flowering - phosphorus and potassium. I add with every watering 56 drops of fertilizer on 1 l of water
PLEASANT GIFT
"Firstborn" with two leaves each 4 cm in a small glass was presented to me by my friend Galina Reznikova. At home, I put the crumb in a zip bag and sent it to the shelf under the lamp. Two months later, the leaves have grown noticeably, and the package became small, and the roots have filled the entire container. Gradually began to accustom the plant to the open air: in the morning and in the evening she opened the clasp on 5 minutes, and three days later I removed the shelter. Transplanted "teenager" into a new glass (200 r). However, the light soil was quickly mastered.. The third sheet has appeared, behind him is a peduncle. Soon the streptocarpus bloomed and even tied a seed capsule.
LITTLE BLANK
Once I put a glass with a plant in water, to saturate the earth lump with moisture, and… forgot. The next day I saw, that the leaf stalks have turned black. She cut long leaf blades for rooting, divided into fragments with main thick veins and planted (squeezing the soil around) in easy, slightly damp substrate in a 200 gram container. Closed from above to others, the same volume. To preserve moisture, the greenhouse was pasted over with tape. I put it under the lamp. She didn't water. As a result, out of four segments, two were rooted.
FOUND THE APPROACH
I water the plant along the edge of the pot, without getting on the leaves and avoiding waterlogging. I let the soil dry between watering.
I feed those who like to “eat” with Fertika fertilizer “Kristalen Universalny” - 2-3 crystals of 1 l of water. I bring food in small doses also in winter, as the plants stand under the lamps.
To increase air humidity, I built a structure: I put the flower pots on inverted glasses and place them in a large tray, into which I add water as it evaporates.
I transplant streptocarpus in the spring. Then I multiply by division. So that the soil is loose, easy, I add agroperlite.
For a small child, I choose a small glass and put it in a zip bag or a closed container. Adult specimens grow in 0, 5-liter pots with drainage holes. I don’t put the drainage on the bottom - I learned to water without "swamp".

MY "FLOWERS"
Plants stand on a table in the back of the room under lamps, which I include by 12-14 hours a day. With this content, handsome men bloom in summer., in autumn and winter. However, there are varieties (when buying, ask), which will not please with winter bloom even with additional illumination.
© Author: Irina AKULOVA, r. Orenburg

"Make friends" with the soil
Buying ready-made soil, choose easy, without biohumus - "straps" do not like excesses. Before you start landing (transplant), I try to "make friends" with the soil. I rub the required amount in the basin with my hands. So that the substrate "breathes", add baking powder: sphagnum or forest moss (1/3 part of the mixture) and perlite (in the same amount). I mix everything and let it brew. Moisten a little before planting (after squeezing in the hand, the lump crumbles). Then I do not water the plant for several days. Then slightly moisturize if necessary. Streptocarpus do not tolerate the bay. It is better to dry the soil a little between waterings..
© Author:Maria SKALKINA
STRAPTOCARPUSES GROW… ON THE YEAST
My streptocarpus didn't want to grow. I read it once, that they love B vitamins, and decided to treat her pets with yeast "potion". First insisted chicken droppings (1 Art. on 1 l of water) 5-6 days at a temperature of about +30 city. Then added 1 Art. l. fresh yeast, 1 ч.л.. sugar and left for more days 5-6 at the same temperature. For watering, diluted 1 ч.л.. insisted on 1 l of water. Top dressing helped! During the period of active growth, streptocarpus quickly developed roots and formed buds. Flowering lasted, until the days are very short.
© Author: Anastasia Vakhrusheva. Kemerovo region. Photo by Maria SKALKINA
SEED STRAP
Streptocarpus from seed
With additional lighting, streptocarpus from seeds can be grown in winter. (I start without backlighting in March).
To make it easier to work with small seeds, I pour them on a white sheet of paper.
Into a transparent food container (250 r) without holes I fill in soil based on high-moor peat with a neutral reaction, I wet it from the spray bottle abundantly, but avoiding swamps, and let the moisture spread out for a couple of minutes.
I sow seeds (the first time you can divide them into 2-3 parts and one sow for a sample) on the soil surface, without sprinkling.
I close the lid and put the container in a brightly lit, without direct rays, warm (+25 city.) a place.
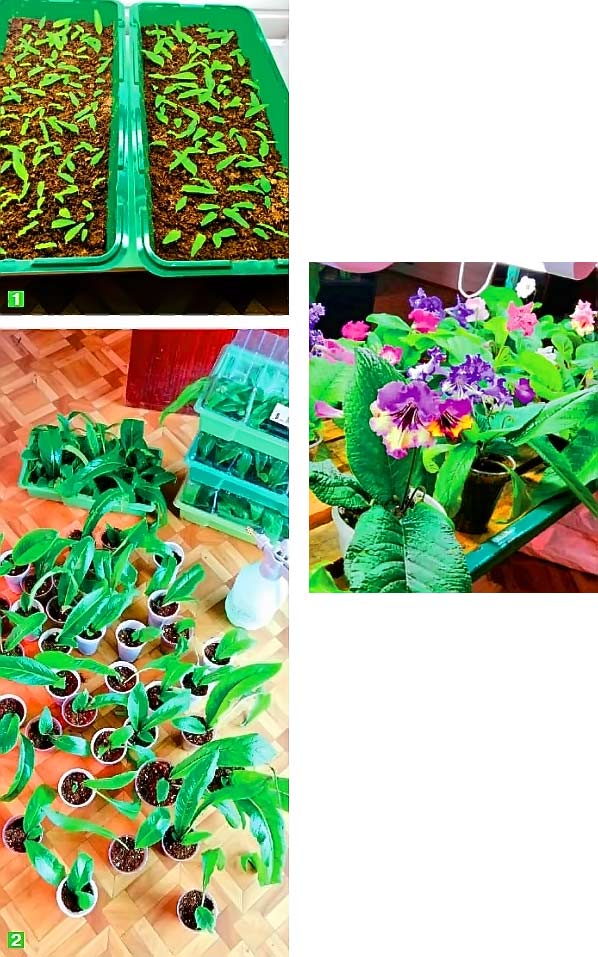
The sprouts are making their way on 5-7 day, all for 20-25 days (Photo 1). After sprouting, I open the lid for a couple of minutes once a day..
Moisture usually lasts for a month, but if the ground dries up, I definitely moisturize. I do not remove condensation from the lid.
When appear 2 leaflet, and one of them lengthens, I dive seedlings into large containers and, closing the lid, put in the same place.
Later 2-3 weeks transplanting again. And so for 2-3 months after sowing I do 3-4 transplants.
After that, I accustom the plants to room air in a couple of days., opening a greenhouse for several hours a day.
Then I make a final dive into glasses (Photo 2), adding perlite or vermiculite to the substrate, foam balls (what is at hand).
When replanting, I use fresh soil, therefore I don’t feed the seedlings.
Important Tips
First, I settle the water for irrigation at room temperature for at least a day., and then I pass it through the drinking filter.
If in doubt about the safety of the ground, spill it with any fungicide or potassium permanganate solution.
© Author: Dmitry LOSEV, Tver region. Photo by the author
STREEPTOCARPUS – VIDEO CARE


